Drywall is an essential component of any home remodel. By handling prepping work yourself, you can save on labor costs and get your project started sooner.
Start by hanging a whole sheet, considering any doors or windows. Be sure the end of each panel sits halfway over a stud. Contact Drywall Installation Las Vegas now!
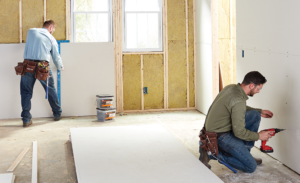
Drywall is an interior wall material made primarily from gypsum, a mineral found in massive beds that look like white sand. It’s less expensive than plaster and much quicker to install. It’s more durable and resists cracking from the house’s settling or improper installation. It also requires less maintenance and can be painted with any color or pattern. For these reasons, drywall has replaced plaster as the most popular wall covering. However, hanging drywall is heavy work and is often left to professionals. If you have the patience and a good set of tools, you can save a lot by doing the labor yourself.
The first step is to measure the walls and ceiling for the amount of drywall you need. Be sure to take into account any windows, doors, electrical outlets and fixtures that you’ll need to cut around. It’s always best to make these cuts after the drywall is hung to ensure the proper dimensions. When cutting out openings for electrical outlets, lights, switches and fixtures, be sure to turn off the power to the box in your circuit breaker before making any adjustments. When possible, mark the height and width of the outlet or fixture on the drywall sheet itself before cutting it out to help reduce mistakes.
Once the sheets are in place, they are typically taped with paper or fiberglass mesh tape at all seams, corners and other areas where the drywall meets the framing members. This helps prevent moisture from damaging the drywall and creating a gap that would need to be filled later. After the tape is applied, a layer of joint compound is spread over it and sanded for a smooth finish.
Some builders prefer to do a vertical installation of drywall for speed and to avoid having any joints to mud. This is usually only done in non-load bearing walls and is more common on commercial projects.
If you’re installing drywall, be sure to use the correct screws for the job. It’s also a good idea to off-set the panels so that they don’t line up too closely, and to leave space for pipes and wires in the future. Finally, be sure to run a putty knife over all of the screwheads to make sure they’re set. It’s a common mistake to skip this step, and it can result in broken or protruding fasteners that will need to be repaired later.
Ceilings
Drywall on ceilings provides a finished and attractive interior. It also helps protect pipes and wires from moisture damage, a major concern in areas where a drop ceiling is not installed. However, it may not be an ideal choice in rooms where plumbing or electrical wiring will need to be accessed later for repairs or upgrades. In these cases, a drop ceiling might be a better choice, as it provides easy access to these systems without needing to remove the entire ceiling or make patch and repair jobs.
The first step in hanging a drywall ceiling is to prepare the framing members by cutting out window and door openings. This can be done by marking the outline of the openings on a drywall sheet and using a utility knife or saw to cut out the marks. For longer cuts, a keyhole saw or circle cutter is recommended. It is important to keep in mind that the edges of these cuts will be a little more exposed, so they should be sanded and painted for a finished look.
Once the cutting has been completed, it is time to start hanging the drywall sheets. Using a drywall lift or making a tee from 2x2s will make this job much easier. The tee can be wedged under a drywall sheet to support it as you work, which will allow you to easily adjust and drive screws. It is also a good idea to pre-nail and position each sheet before screwing it in place, as this will help to prevent the drywall from shifting or sagging over time.
When hanging a drywall ceiling, it is a good idea to start at the bottom and work your way up. This will make it easier to align each panel with the ceiling joists. It is also a good idea to use a plumb bob or level to check that each sheet is hung perpendicularly to the joists.
To help reduce the risk of sagging or shifting, it is a good idea to fasten each drywall sheet to its joists with at least five screws. It is also a good idea, especially on long sheets, to set the fasteners slightly below the surface of the paper. This will help to ensure that they do not pull through the gypsum core and cause additional damage.
Floors
Drywall installation is a common project for homeowners who want to add finishing touches to their home. Unlike most DIY projects, hanging drywall is relatively simple and does not require any expensive specialty tools. However, it is heavy work and if you are not in good physical condition, hiring professionals may be a wise choice. To save money, try working on one or two rooms at a time instead of the whole house.
Start by identifying all the studs in the ceiling or wall. Using a level and straight edge, ensure that the framing is flat from one end to the other. Shimmy or smooth down joists and studs as needed.
Generally, you should not hang drywall directly on the floor. The drywall and the wood floor expand and contract at different rates, so direct contact is likely to crack the drywall. An expansion joint is required between a finished floor and the drywall. An expansion joint is also a good idea where a room is undergoing significant structural change such as adding new windows or moving fixtures.
Before you begin hanging drywall, make sure that your gypsum board is moisture, mold and mildew-resistant and fire-rated. It should also have a coated fiberglass mat on both the front and back. A grid of guide marks, called GridMarX, should be printed on the face of gypsum boards and is located every 4 inches in both tapers, as well as at 16″, 24″ and 32″ o.c. The grid will help you identify a wall or ceiling stud for fastener placement and help ensure that your drywall is aligned with the framing.
Position the first drywall panel against the ceiling so that one edge butts against the abutting wall and the other ends fit snugly against joists in the ceiling. Fasten the drywall to the ceiling studs with a line of five evenly-spaced screws. Continue screwing along the length of the drywall until you reach the center of the nearest joist, double-checking that each screw is at least half an inch away from the edges of the sheet.
Trim
Drywall is used throughout the home to create walls and ceilings, but it is also a key construction material in trim. It helps to create a smooth and attractive finished surface for walls, doors, windows and other design elements, as well as adding fire resistance for interior areas. Drywall is easy to install, durable and requires simple repairs when damaged.
Before beginning drywall installation, determine how many sheets of drywall you will need for your project. Taking the time to plan your layout ahead of time will help to reduce waste, eliminate unnecessary seams and make the finishing process easier for you or your contractor. Ideally, you will want to hang your drywall horizontally for walls and vertically for ceilings. This minimizes seams and will make it more difficult to notice them. It may also save you money by allowing you to buy a smaller quantity of drywall sheets.
Once you begin hanging your drywall, it’s important to take your time and be precise in your measurements. This will allow you to cut as little of the drywall as possible, making your job much faster and easier down the line. It’s also a good idea to have an extra sheet of drywall on hand for any mistakes or miscalculations.
When working with a large room, you can save time and energy by pre-cutting all your drywall panels before you start the actual hang. This will give you a much more accurate fit and help to avoid the common mistake of over cutting. Alternatively, you can cut your drywall as you go, which is fine but will require more patience and precision.
For outlets, lights and other fixtures that will need to be drilled through your drywall, consider using a spiral saw to get the job done quickly and accurately. These saws are designed to cut through drywall without damaging it and can be purchased from most hardware stores.
When you’re finished hanging all of your drywall, be sure to run a putty knife over every fastener to make sure that they are set below the surface. It’s a common mistake to skip this step, which can lead to broken screw heads that will need to be patched later on.